
How to Build a Budget Pedalboard for $9: A DIY Guide
So you've spent money on getting a nice bunch of pedals and now it is time to put them all together. You don't really want to spend time pulling apart the daisy chain and cables every time you set up your guitar rig, so the answer is a pedalboard.
I've got a really nice Pedaltrain 3, but it is heavy! It was getting a bit annoying lugging it around to gigs where I just didn't really use that many sounds. I discovered that stores wanted an obscene amount of money for even the smallest boards, so I decided to figure out how to build a budget pedalboard myself.
In a moment of pique, I decided to build my own. How hard could it be? Well, it's super easy and I'll show you how in this photo-by-photo guide.
Why Every Guitarist Needs a DIY Pedalboard
Beyond saving money, building your own board allows you to customize the size perfectly to your gigging needs. If you've been looking for a way to streamline your setup without breaking the bank, this guide is for you.
What You Will Need:
- Pedalboard case: Briefcase or laptop bag
- Carpet offcut: High-grip automotive style
- Glue: Selleys Kwik Grip
- Velcro: For the back of your pedals
- Power: Daisy chain & power adaptor
- Cables: Short 1/4 inch patch cables
- Tools: Drill, ruler, and measuring tape
- Time: About an hour of building time
Step-by-Step: How to Build a Budget Pedalboard
Step 1: Plan Your Layout
The first thing you need to do is decide what effects/stompboxes you are going to house. I needed to house four, including a large Jim Dunlop Wah. Get an idea of measurements before moving to the next step.
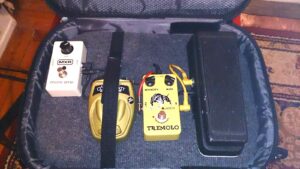
Step 2: Source a Case
Go to a charity shop or op shop and buy a suitcase, laptop bag, or briefcase large enough to house your chosen pedals. I bought a laptop bag for $2. It's made of hard-wearing nylon and is slightly padded inside.

Step 3: Get Your Board
Go to your local hardware store or a timber merchant. I went to a timber merchant in Rozelle, Swadlings, who also cut it to size for me. Total cost $5. Don’t get anything too heavy, but make sure it is sturdy enough to step on.
Step 4: Fit the Board to the Case
If you didn't get it cut to size already, cut it to the same size as the inside of your freshly acquired case. It shouldn't be too tight, but you don't want it floating around in there.
Step 5: The "Velcro-Friendly" Carpet
To ensure the pedals stay in place, you'll need some velcro-friendly carpet. I went to Clark Rubber and got an offcut of automotive style carpet for about $3. Take your velcro to the store with you to make sure it sticks to the carpet you buy!
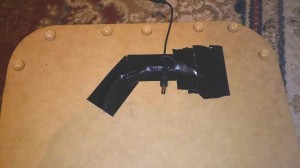
Step 6: Drills and Power
Figure out where your pedals will sit and where the daisy chain for powering the pedals needs to come up from under the board. Make holes with a drill to keep the top of the board clean.
Step 7: The Glue Phase
I used a 250g tub of Selleys Kwik Grip ($8). Cut the carpet slightly bigger than the board; you can trim it once the glue has dried. Pro-tip: Don't glue the carpet inside the house. The smell is intense and will likely get you in trouble with your housemates!
Step 8: Mount the Pedals
 Wait a day to make sure the carpet is firmly stuck, then place your pedals. Use adhesive-backed velcro on the back of the pedals. Make holes in the carpet where you pre-drilled the board to thread your power cables through.
Step 9: Add Rubber Feet
Buy some small self-adhesive rubber feet and stick them to the bottom of the board. That way the daisy chain power cable won't get snagged or crushed. To power the pedals, I use a One Spot.
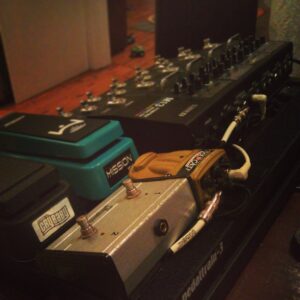
Step 10: The Finished Build
 Install the pedals and daisy chain, pop the pedalboard in your new case and go have a beer. You've just learned how to build a budget pedalboard for a fraction of the retail price.
If you have any questions, please just leave me a comment. Got your own DIY pedalboard build stories? I would love to hear all about it.
Until next time,
Simon